

What Size Of Screwes Used To Fix The Back Cover Of Hp-pavilion Laptop
Z7_3054ICK0KGTE30AQO5O3KA30N0
Removing and Replacing the Base Enclosure for HP Pavilion x360 Notebook PCs
This certificate applies to HP Pavilion x360 notebook computers.
Before you begin
-
You need a Phillips head screwdriver.
-
Turn off the computer. Disconnect the Ethernet or modem cable. Disconnect the power cord.
-
Transfer the figurer to a clear, flat, stable piece of work surface over a non-carpeted flooring.
-
HP strongly recommends the use of an anti-static wrist strap and a conductive foam pad when working on the figurer.
-
Practice not remove a component from its protective packaging until you lot are set up to install it.
warning:The edges of metal panels can cut peel. Be careful not to slide skin along any interior metal edge of the estimator.
warning:Before starting, power off the reckoner and await for components to absurd before starting these procedures.
caution:This product contains components that can be damaged by electrostatic discharge (ESD). To reduce the adventure of ESD damage, piece of work over a non-carpeted floor, use a static dissipative piece of work surface (such as a conductive cream pad), and wear an ESD wrist strap connected to a grounded surface.
caution:Procedures in this document are provided by HP for qualified service agents and as a courtesy to its customers. Servicing internal components increases the adventure of damaging the computer which might not exist covered under warranty. Empathize the hazard and refer to the product's warranty before attempting to service the calculator.
Video overview
View the following video earlier using the steps in this article.

note:The video and graphics in this article describe a specific configuration of notebook computer. These same removal and replacement procedures apply to all configurations for all HP Pavilion x360 Notebook computers.
Removing the base enclosure
warning:Make certain the computer is disconnected from ability before starting.
Follow the steps in this department to remove the base enclosure.
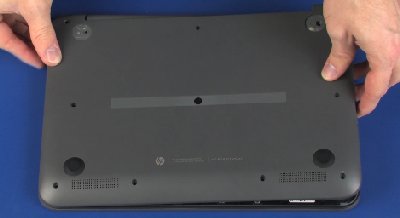
| Step 1 Remove the 2 rubber feet from the rear corners of the base enclosure. | |
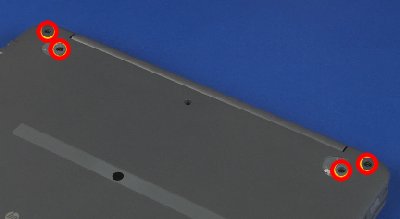
| Step 2 Remove four screws that secure the base enclosure to the meridian encompass. notation: | |
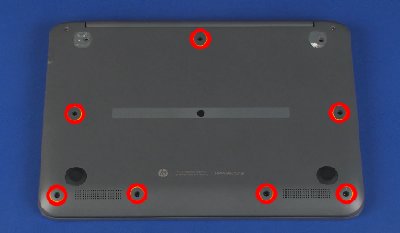
| Step 3 Remove seven more screws that secure the base of operations enclosure to the meridian cover. | |
| Step iv Starting with the edge of the base enclosure almost the power button, carefully release the retentivity clips on the outer edges of the base enclosure from the superlative encompass. | |
| Stride v Elevator the base enclosure off the computer past prying it upwards and lifting... | |
| ...taking care to flex the base enclosure as necessary to remove the enclosure from over the HDMI connector. | |
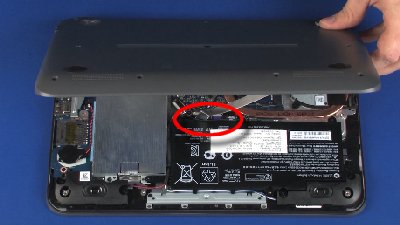
| Step 6 Lift the base enclosure until you accept access to the ribbon cablevision and its connector. | |
| Step vii Advisedly elevator upwards the locking bar on the connector. caution: | |
| Footstep viii Remove the cable from the connector, and elevator off the base enclosure. | |


Replacing the base enclosure
Utilize the steps in this department to supplant the base enclosure.
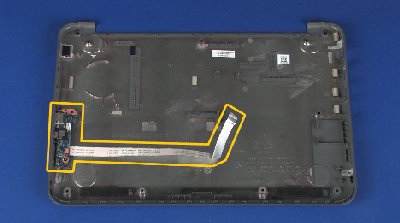
| Step 1 If installing a new base of operations enclosure, remove the USB board from the inside of the old enclosure and install information technology on the inside of the new base of operations enclosure. | |
| Step 2 Place the base enclosure over the computer so that the USB cable tin can exist reconnected. | |
| Step 3 Insert the ribbon cablevision in the connector and push down on the locking bar to secure information technology. | |
| Step 4 Supercede the base enclosure ensuring that the HDMI connector fits in its intended opening on the side of the base enclosure... | |
| ...and lower the base of operations enclosure onto the computer. | |
| Footstep 5 Printing downwardly on the edges of the enclosure to snap it into place. | |
| Footstep 6 Supervene upon seven screws that secure the base enclosure. | |
| Step seven Replace the other four screws that end securing the base enclosure to the computer. | |
| Footstep viii Supersede the two rubber feet. | |


What Size Of Screwes Used To Fix The Back Cover Of Hp-pavilion Laptop,
Source: https://support.hp.com/us-en/document/c04157949
Posted by: gonzalezhounnenst.blogspot.com
0 Response to "What Size Of Screwes Used To Fix The Back Cover Of Hp-pavilion Laptop"
Post a Comment